Since, I spent so much money and will be putting off a serger purchase for awhile, I figured that I should try my hand at more knit garments using the new Juki. I found the double layered construction method on a retired White House/Black Market shirt from many moons ago. This technique gives a simple knit tee extra wearing longevity and opacity to white fabric. I found that a heavier jersey and a more substantial overcast at the neck seam allowances gives structure for a crisper edges. This red stretch fabric was super cheap at Fabrix, is probably poly or poly blend knit with a soft, silky, drapey hand.
Mark and cut pattern pieces with 1/4" seam allowance. Cut two at a time of the same pattern piece as a whole rather than folding at the center line (which makes your grain off and possibly your hem. How do I know?!). At the neck edges and armhole, trim a very scant 1/8" off of the seam allowance. Measure and mark a point at the V-neck at center front, 1/4" below the tip. Notch.
Put the front garment pieces right sides together, matching the shorter edges to the longer edges and pin. Sew directionally from along one V-neck edge, by starting several stitches on one leg of the V, picot at the marked point, and continue sewing off the straight end. Repeat for the other side. Snip the seam allowance to the V-neck point, allowing the garment to lay flat. Clip the corners of the jewel neck. Use the reinforced stretch stitch setting for a firm but elastic neck edge.
I was having some trouble with loops in the stitches on the backside, but I dialed the tension and that seemed to help.
On "Auto" or normal tension, the same stitch is fairly neat on a piece of muslin.

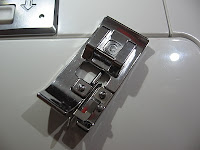
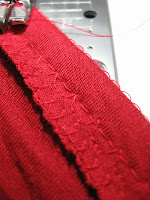
 Overcast the raw seam edges using presser foot C. There are several to choose from, but the machine/foot only allows a 5.0 mm width, rather than the total 7mm.
Finished seam is light and flexible. Technically, since the top is sandwiched and the fabric doesn't come apart that easy, the seams don't need to be finished at all. However, I find that the added stability makes this particular blouse hold it's shape better.

 Using a longer straight stitch length, right hand needle position and the edge stitch foot D, "understitch" from the public side (basically topstitch) through the "shorter" pattern piece and seam allowances along the neck edges at 1/8 from the ditch. Repeat the entire process with the rounded neck edge. Starting from the shoulder corner, stitch at 1/4" seam allowance, overcast, and understitch as far as possible, about an 1" away from the corner.
 I was having trouble with the understitches coming out wobbly when I sewed with the regular A foot, but simply changing to a slightly longer stitch length and using the edgestitch foot seemed to do the trick.

Sew armholes together using the reinforced stretch stitch setting as above. Overcast but do not understitch.

Match the back garment pieces right sides together, easing the shorter edges to the longer edges. Proceed with the neckline of the back garment and armholes as above. Overcast all seams, but understitch only the neckline and not the armholes.


Lay the back garment on a table wrong side out with the understitched side down. Insert the front garment shoulder strap (right side out with the understitched side down) into the back garment shoulder seams and match the lengths precisely. Pin. Sew the shoulder seam at 1/4" seam allowance with a straight stitch.


On the Juki, the elastic"straight"stitch has left hand default position, so determining 1/4" was a manual process of actually measuring. I still need to determine what those needle positions actually dimension out to, perhaps in another post.
Following the text in the manual, I finished the bottom edge of the blindhem using the edge stitch foot D. Mark the folding line with a long basting stitch and press over to the wrong side. Mark the finished line. Fold the garment and pleat out of the way so only the coverstitched edge is on the right of the needle. The needle needs to barely hit the stack of fabric on the left side of the edge foot and then clear the center bar before going down three stitches or so on the right, thus the -7 setting on the screen. I used my hand crank to test that the needle never hit metal.
 I used a Schmetz size 12 ballpoint needle, but perhaps could have gotten away with smaller. All these fancy stitches aren't necessary, since a plain straight stitch and serged edge works very well on the original, but I thought I might as well try them out. The wonky hem is a result of poor cutting as opposed to bad sewing. I added extra seam allowance though, so I can make that plumb no problem.
Since the material was so flimsy, this project is an instance where I'm not using the auto cutters. Instead, I pull up the bobbin end and held both top and bottom threads at the start of each stitch. To give the Juki credit, however, even when using autocutters and getting a little snarl ball, the fabric never fully jammed like my Singer.
The main issue I had during this process was tension adjustments for certain types of stitches. At one point, after fiddling with tension and foot pressure didn't work so well, I rethreaded everything and the problem was solved. Strange since that was towards the middle of the project with nary an issue otherwise. The basting stitch on the cross grain, really needed dialing up to get flat (unnecessary fiddling because a looser baste will be easier to pull out anyway). For the most part, tension needed at least a click +.
Finally, I was pretty sure I would settle into a routine for needle up/down position, auto thread cutting, speed setting, etc. but I'm finding that having options helps me in different situations.


0 comments